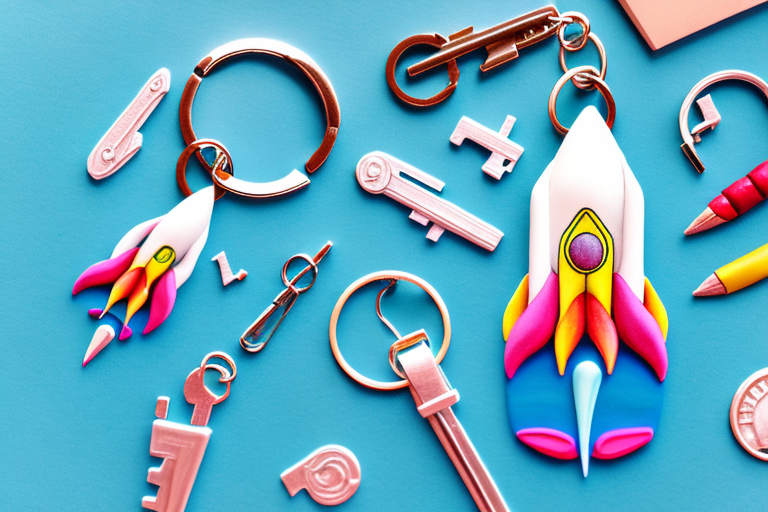
A rocket ship keychain is a fun and unique accessory to add to your collection, and making one yourself with polymer clay and key rings is easier than you might think! In this article, we’ll guide you through each step of the process, from gathering the necessary materials to personalizing your finished keychain. Let’s get started!
Gathering the Materials You Need
Before you begin crafting your keychain, there are a few essential materials you’ll need to gather. Firstly, you’ll need some polymer clay in the colors of your choice, as well as a few tools to help you shape and add texture to your keychain. We recommend a clay roller or pasta machine, a set of clay shaping tools, and other embellishments like beads, paint, and glitter, if you’d like to personalize your keychain even more. You’ll also need a key ring to attach to your finished piece. Make sure you have all of these items on hand before starting!
It’s important to note that when working with polymer clay, you should always work on a clean surface and wash your hands thoroughly before handling the clay. This will prevent any dirt or debris from getting mixed into the clay and ruining your finished product. Additionally, if you’re new to working with polymer clay, it’s a good idea to practice shaping and molding the clay before starting on your keychain. This will help you get a feel for the material and ensure that your keychain turns out just the way you want it to.
Preparing the Polymer Clay for Your Keychain
Once you have everything you need, it’s time to get started! Begin by conditioning your clay according to the manufacturer’s instructions. This will make it easier to mold and shape later on. Once your clay is ready, use a roller or pasta machine to flatten it to the desired thickness, depending on how large you’d like your keychain to be. Use your clay shaping tools to cut out the basic shape of your rocket ship, keeping in mind the size of your key ring, as you’ll need to attach it later.
After you have cut out the basic shape of your rocket ship, you can start adding details to make it look more realistic. You can use different colors of clay to create windows, doors, and other features. You can also use a toothpick or other small tool to create texture on the surface of the clay. Be creative and have fun with it!
Once you are satisfied with the design of your rocket ship, it’s time to bake it in the oven according to the manufacturer’s instructions. After it has cooled, you can attach the key ring to the top of the rocket ship using a small jump ring. Your unique and personalized keychain is now ready to use!
Shaping Your Rocket Ship Keychain with Polymer Clay
With your basic shape cut out, use your shaping tools to add details like windows, fins, and engines to your rocket ship. Be creative, and add any extra details you’d like to make your keychain unique! Once you’re happy with the overall shape and design, use a toothpick or other tool to poke a hole through the top of the keychain, where you’ll later attach the keyring.
After shaping your rocket ship keychain, it’s time to bake it in the oven according to the instructions on your polymer clay package. Make sure to place it on a baking sheet lined with parchment paper to prevent sticking. Once it’s done baking, let it cool completely before handling it.
Finally, attach the keyring to the hole you made earlier using pliers. Your rocket ship keychain is now ready to use or give as a gift to a space-loving friend!
Adding Details and Texture to Your Keychain
Next, it’s time to add texture and sparkle to your rocket ship keychain. You can do this by using your clay shaping tools to create ridges and indents, or by pressing in small embellishments like beads or rhinestones. You can also use paint or glitter to add extra shine and color to your keychain. Remember to be patient and take your time with this step, as the little details will make your finished piece really stand out!
Another way to add texture to your keychain is by using different types of clay. You can mix different colors or types of clay together to create a marbled effect, or use a textured clay to add a unique pattern. Additionally, you can experiment with different shapes and sizes for your keychain, such as adding a small star or moon charm to complement the rocket ship. Don’t be afraid to get creative and make your keychain truly one-of-a-kind!
Baking Your Polymer Clay Rocket Ship Keychain
When you’re happy with your finished design, it’s time to bake your keychain according to the manufacturer’s instructions. Make sure to place it on a clean baking tray and follow the recommended time and temperature for the specific brand of clay you’re using. After baking, remove your keychain from the oven and let it cool completely before handling.
It’s important to note that polymer clay can release harmful fumes when heated, so make sure to bake your keychain in a well-ventilated area. You may also want to consider using a dedicated toaster oven or a baking dish that you don’t plan on using for food to avoid any potential contamination.
Once your keychain has cooled, you can add any finishing touches, such as a coat of varnish or a keyring attachment. Polymer clay is a durable material, but it’s still important to handle your keychain with care to avoid any accidental breakage. With proper care, your rocket ship keychain can be a fun and unique accessory for years to come!
Sanding and Finishing Your Keychain for a Professional Look
Once your keychain has cooled, you may need to sand away any rough edges or imperfections with a fine-grit sandpaper. This will help your keychain look neat and professional, and will also make it more comfortable to hold and use.
After sanding, you can apply a coat of clear varnish or lacquer to protect the surface of your keychain from scratches and wear. This will also give it a glossy finish that will make it stand out.
If you want to add some color to your keychain, you can use acrylic paint or spray paint to give it a unique look. Just make sure to apply the paint in thin layers and let it dry completely before adding another layer or handling the keychain.
Attaching a Key Ring to Your Rocket Ship Keychain
With your keychain shaped, textured, and baked, it’s time to attach a key ring to the top. You can do this by using pliers to open the ring, sliding it through the hole in the top of your keychain, and then closing it securely again. Double-check that the ring is secure and won’t come loose when in use.
It’s important to choose a sturdy key ring that can withstand daily use. A weak or flimsy ring may break or come loose, causing you to lose your keys. You can find key rings made of various materials, such as metal, plastic, or silicone. Consider the weight of your keychain and the size of the ring when selecting the appropriate key ring. A larger keychain may require a larger ring to ensure a secure attachment.
Personalizing Your Keychain with Paint or Other Embellishments
If you’d like to add even more personalized touches to your keychain, you can use paint, glitter, or other embellishments to make it truly unique. Try experimenting with different color combinations and designs, or use stickers or decals to add extra detail. The possibilities are endless!
Tips and Tricks for Working with Polymer Clay
Working with polymer clay can be fun and rewarding, but it can also be challenging if you’re new to the craft. Some helpful tips include keeping your workspace clean and organized, using a gentle touch when shaping your clay, and always following the manufacturer’s instructions for baking and finishing your piece. Be patient with yourself, and don’t be afraid to experiment and try new things!
How to Customize Your Rocket Ship Keychain to Fit Your Style
One of the best things about making your own keychain is that you can customize it to fit your own personal style and interests. Try using different colors or textures of clay, or experiment with different shapes and sizes for your keychain. You can even create a set of matching space-themed accessories, like earrings or bracelets, to complete your look!
Choosing the Right Colors for Your Polymer Clay Keychain
Choosing the right colors for your keychain can be a fun and exciting part of the process. Consider using a mix of bright, bold colors to create a playful and eye-catching design, or opt for a more subdued color scheme for a classic and timeless look. Don’t be afraid to experiment and try new combinations!
How to Make Multiple Rocket Ship Keychains at Once
If you’re making keychains as gifts or for sale, it may be more efficient to make multiple pieces at once. To do this, simply repeat the shaping and texturing process for each keychain, and then bake them all at the same time. Make sure to keep each piece separated on the baking tray to prevent them from sticking together.
Making a DIY Gift: Ideas for Personalized Polymer Clay Keychains
If you’re looking for a fun and unique DIY gift idea, personalized polymer clay keychains are a great option. Consider making keychains in the favorite colors or shapes of your friends and family, or add extra embellishments like initials or birthstones for a truly special touch.
Creating a Matching Set of Space-Themed Accessories
If you’re a fan of all things space-themed, consider creating a matching set of space-themed accessories to wear and share with friends. Keychains, earrings, bracelets, and necklaces can all be made with polymer clay and other jewelry-making techniques, and can be personalized to fit your own unique style.
Selling Your Handmade Polymer Clay Rocket Ship Keychains Online
If you’ve developed a passion for making keychains or other handmade accessories, you may want to consider selling your creations online. Websites like Etsy and Amazon Handmade offer a platform for artisans to share and sell their work, and can be a great way to earn extra income doing something you love!
Exploring Other Creative Uses for Polymer Clay in Jewelry Making
Polymer clay is a versatile and affordable material that can be used to create a wide range of other jewelry-making projects, from earrings and bracelets to necklaces and pendants. Try experimenting with different shapes and designs, or combine polymer clay with other materials like wire or beads for a truly unique piece.
Troubleshooting Common Issues When Working with Polymer Clay
Working with polymer clay can be frustrating at times, especially if your design isn’t turning out the way you’d like it to. Some common issues include clay sticking to your hands or tools, or cracking or breaking during the baking process. To prevent these issues, make sure to work on a clean surface, use a light touch when handling your clay, and always follow the manufacturer’s instructions for baking and finishing your piece.
Caring for and Maintaining Your Polymer Clay Keychain Over Time
With proper care and maintenance, your polymer clay keychain should last for years to come. To keep it looking its best, avoid exposing it to extreme temperatures or moisture, and store it in a dry, cool place when not in use. When cleaning your keychain, use a gentle soap and water solution, and avoid using harsh chemicals or abrasives.
That’s it, you’ve now learned how to make a rocket ship keychain with polymer clay and key rings! We hope you found this article informative and enjoyable, and that you’ll use these tips and tricks to create your own fun and unique keychains to enjoy or share with friends.